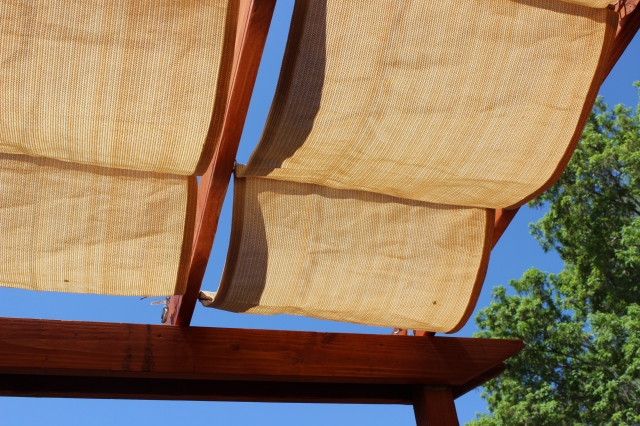
Living in Utah is wonderful but, man, that sun is HOT! We needed a solution to beat the heat on our west facing porch. The pergola design allows for shade when needed and retractable curtains when the sun goes down. 
We started the project by installing three vertical beams. The 4×4 vertical beams were incorporated into our existing railing.
A 4×4 board was placed across the top of the vertical beams, and two 2×6’s were added for a decorative finish.
We attached a decoratively cut 2×6 board to the house using long outdoor screws. To that, we attached horizontal boards using adjustable metal joists. The right end of the horizontal boards were attached to the 4×4 header using simple 90 degree connectors. 
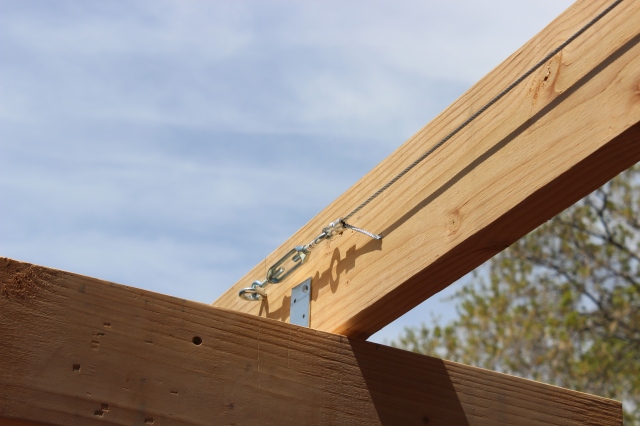
The design of the curtains was important. They needed to be retractable and durable to withstand all kinds of weather. The tracks that the curtains run on was made out of 1/8th inch aircraft cable secured with screw eyes and turnbuckles. Make sure to buy or borrow a swagging tool to tighten the metal sleeves to make the end loop.
The curtain is attached to the aircraft cable using 1/2 inch conduit and key rings. The design for these curtains was found here. The fabric I used came from a breathable shade sail. Many sizes and colors are available through awnings-usa.com. 
One final aircraft cable was installed inside the pergola header. A hole was drilled through the middle vertical beam so that the cable could extend through. The curtain is attached using grommets (craft store) and carabiners (HomeDepot).
The final touches were these Velcro tie backs…… Isn’t Utah gorgeous?!


Very nice design & installation. Looks Great Thanks,
Ed Marvin Marvin Metals Inc. 715-256-1602 emarvin@marvinmetals.com
Great idea & looks very nice! Will definitely be using this to make my very own. Thank you!
Beautiful! I’m so inspired by your roof shade design. I’d like to do this for my deck here in Colorado. I’ve had issues in the past with shade sails collecting rain and sagging from the water weight. Have you had any issues with rain collecting? How well does the shape of your roof fabric hold up during a windy day?
I have not noticed any rain collecting, but I haven’t looked too closely. The roof fabric holds up very well in wind, rain, snow, etc. It really has been very hardy.
Thanks for posting the Pergola Project, I’ve been looking at different types of coverings for our patio and I’d say yours gives me the most cost effective way to be able to control the sunlight. Did you intend to be able to roll your shades up or down? or keep them fixed in one position, i figured with the cables you could open them up but i didn’t see any clips or other attachement to hold the shades open. Also, could you tell me if you ordered your shadings in the lengths used in your project or if you ordered a large shade and had it modified for application? The runner stitched into the shades was where i wondered if you did your own tweaks. Thanks again
They can roll up and down. I leave them down most of the summer and pull them back during the winter months, usually. I don’t really need to secure them open; they tend to stay where ever I put them. I bought one large shade sail and sewed them myself. I used a larger needle on the sewing machine and kept the presser foot up. It was pretty easy, but still took a good bit of time with all the pieces.
I did not know you blogged! You should post more 🙂
How has the shade held up? I’m thinking of doing something for our patio this summer cuz it is so hot during the day, and any plants we put out there just fry in the sun.
The shade is very durable. It looks the same as the day we put it up! Let’s plan out a pergola over your porch!!
Hi there, this is exactly the type of thing I’m looking to make. Did you sew a dowel or anything like that into the width of your fabric where the grommets are? Or is that just a seam?
Thanks.
If you are referring to the fabric pieces that span the top of the pergola, no there isn’t a dowel. I folded the fabric over and sewed in a seam. Then the conduit slid right into the hole created by the seam. Thanks for your interest!
Pingback: 9 Clever DIY Ways for a Shady Backyard Oasis | The Garden Glove
Hi, your design looks great & is exactly the type of application that my husband & I have been looking for to shade our west facing deck. Can you share the length of the fabric vs. the length of the pergola from house to deck railing? The swag of your fabric is the perfect size & I’d like to duplicate. It appears that it’s less than a 2:1 ratio .
Thanks!
My total fabric length is 86 and the run length is 77, so yes much less than 2:1 (more like 1.1:1). Remember to add length in the fabric for loops. Each of my loops are 2″ long (doubling back to make a 1″ hole).
Pingback: 10 Creative DIY Outdoor Shady Space Ideas • DIY Tips
That looks amazing and I would love to make one here. How do you attach the 4×4 vertical posts to the existing deck? It looks like there is a lag bolt going from the existing deck and I assume it goes all the way through the new 4×4. I have been wondering how some height to my deck using posts but hadn’t thought of lag bolts thanks.
Pingback: 8 DIY Hacks With Shade Cloth at Home | The Temporary Fencing Shop
Pingback: 22 Εύκολες DIY ιδέες σκίασης για την αυλή ή το αίθριο | Τεχνοτροπίες Και Διακόσμηση
Pingback: 16 Easy DIY Backyard Sun Shade Ideas for your Backyard or Patio - The ART in LIFE
This looks amazing! I would love to do the same for my deck. How did you incorporate the 4×4 vertical beams into your existing railing? Thanks!
We drilled a starter hole and then carefully used a jigsaw to cut the 4×4 square out of the existing railing.
Pingback: Un po di ombra in giardino! Ecco 20 idee fai da te... Lasciatevi ispirare!
Pingback: 5 Ways to Upgrade Your Backyard for the Summer in 2017 & Beyond